- Member ID
- #1296
- Messages
- 79
- Reactions
- 160
- Likes
- 27
- City
- LIBRARY
- State
- CO
- Country
- United States
(MODIFY AT YOUR OWN RISK !)
This is a Wiki - Additional pictures, info, specs, methods, welcome !
2015 Charger with 23,000 Miles
Mods: Metco 2.85" pulley, DS unlocked PCM, DS Trinity T1000, HHP/Hemituner Custom Tune, Procharger crank pin kit and new crank bolt, DSS AL DS, AFe Intake, 180 tstat, Nitto 305/35R20 - 555R's
Prework: (Based on DiabloSport)...install unlocked PCM (you tube video), ensure you have & appropriate usb drivers for your laptop & latest DSdownloader & DSdataviewer software (uninstall older version of both if you have them before you install new ones) with DSdownloader program open you can update the tool (bottom tab > express tune mode > "Update tool" button) to latest (DCX_gas.CROM) is on DS handheld. Backup/copy the stock PCM tune (.drg) file format with DS handheld plugged it into OBDII port (select vehicle : 6.4L SRT8 (don’t worry it doesn’t matter that it is not a Hellcat) and then tell it to install “93 OCT performance tune” or anything from the performance menu - NOTE: it will not install this tune onto your PCM, as that’s not what you want anyways, but it will copy/backup the original OEM tune from the PCM, once it's done, you can exit back to main menu and unplug handheld) , transfer tune to your computer with DSdownloader by clicking “get tune from tool” button (bottom tab menu > express tune mode) , make sure you remember name & save this tune somewhere on laptop (best to copy this file again and save as back up somewhere else like on a usb flash drive) ...email this (.drg) file to tuner with list of all mods....may take a week or two to receive new tune, take this time to clear the common P1645 code or others with your handheld and then run car with new PCM and ensure smooth operation and no more codes...(should be cherry)...once you get the new modified tune...start to install the Mods...(this way you can flash it right away and have fun immediately)
Install Pulley:
Pre-wash engine especially where base of SC mates to engine
1a. Disconnect battery in Trunk
1b. remove wipers (pop off covers, unscrew bolts, lift hinge @ 90 degrees, pull off)
2. remove wiper cowl/braket (plastic push pins/clips at base of windshield/ some bolts on wiper bracket and clips on wiper motors)
3. un-clip any sensor connectors (there will be a few style of connectors, be patient and un-clip properly - no need for excessive forces) on SC/Snout/TB/CAI or that will pull when you lift SC lid later (tuck aside) you do not need to touch the injector pigtails or sc coolant lines or fuel rails...yay!
4. remove air intake tube from TB (can leave air box in place) (Leave TB connected to SC snout)
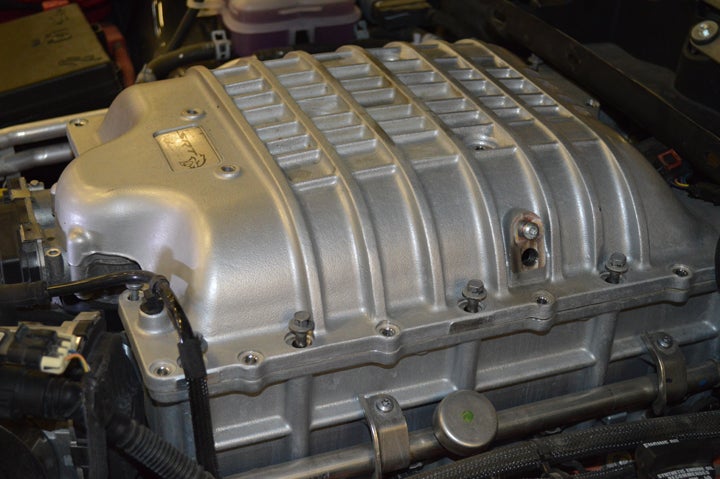
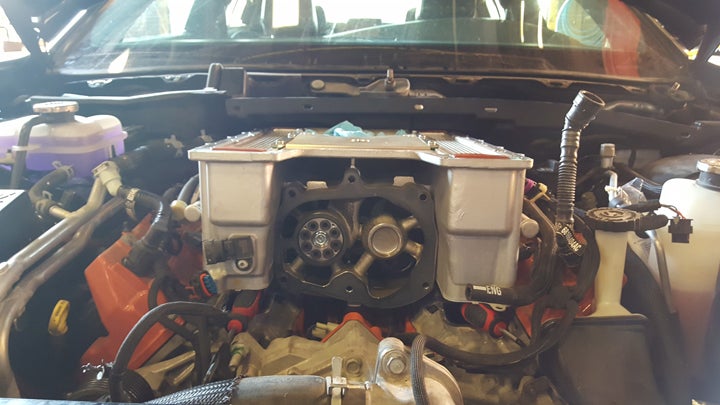
5. remove sc lid (leave bypass valve on lid, slowly & slightly lift lid .5” from middle front, un-stick sc lid gasket slowly & gently all around with flat screwdriver, (mine was stuck between both so it would have ripped if I just quickly lifted), once free, carefully remove gasket entirely (inspect , place aside on clean surface), lift off lid entirely (bypass valve will wiggle rest of the way out of the rubber grommet, retain the 6 x 1.5” long -thin green rubber gaskets, 3 on each side on underside of lid -they seal some intercooler gaps- push them back into their slot on SC lid), (cover/block the exposed rotor air outlet so nothing falls down in there)
5a. If you damaged some gaskets here is the gasket assembly kit you'll need to order: 68267539AA

5a. remove bypass valve grommet bracket (3 bolts)
6. remove both belts completely, then put new sc belt loosely in its belt path but not around the sc pulley yet, then fully install the other serpentine belt- as you can’t get the sc belt on unless other belt is off
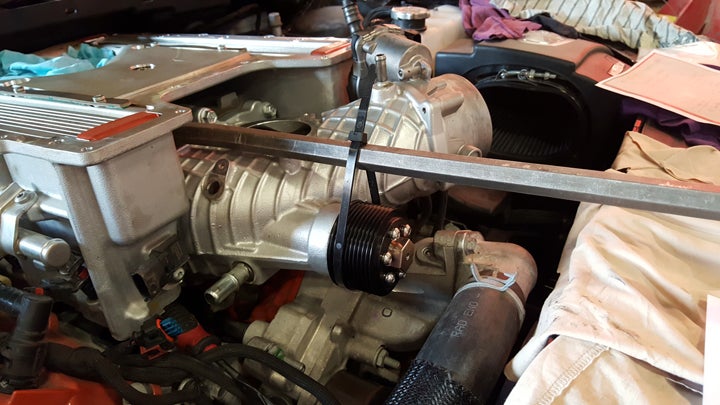
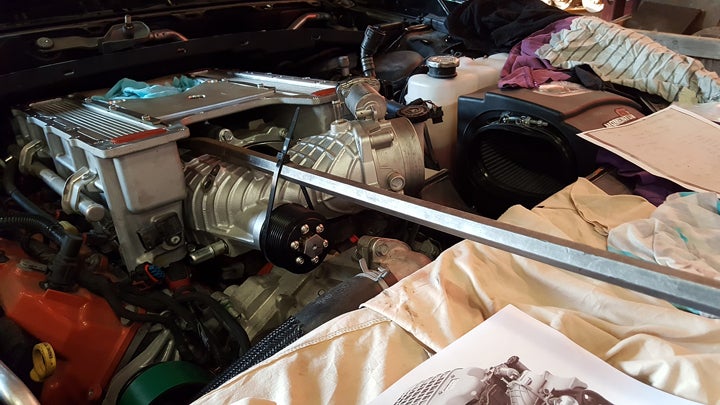
7. lift front front of SC up with crowbar or beaker bar zip tied around pulley lift by 1.5”, prop up each side with something soft & durable – I used rubber screwdriver handles...(bar provides a controlled lift so as not to disturb the steel intake gasket -mine was stuck on underside of SC) (note: pulley in this picture is the new one)
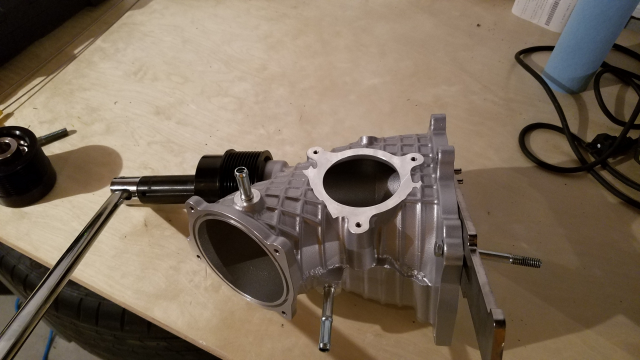
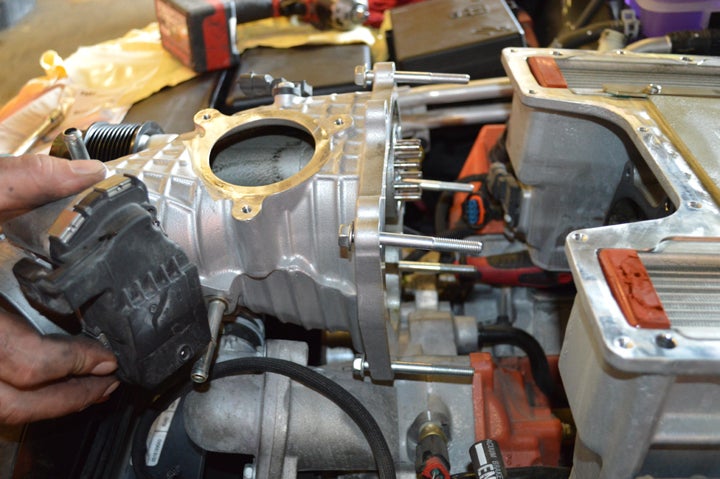
8. remove snout - to access (13mm) bolts you’ll need approx. 9” swivel extension socket, pull /wiggle snout straight back (retain the 6 dowel drive pin bushings seated in the SC housing as some might come out all together or simply need to be tapped back in, also ensure gasket remains unscathed –mine was stuck and didn’t move off the housing –perfect !)
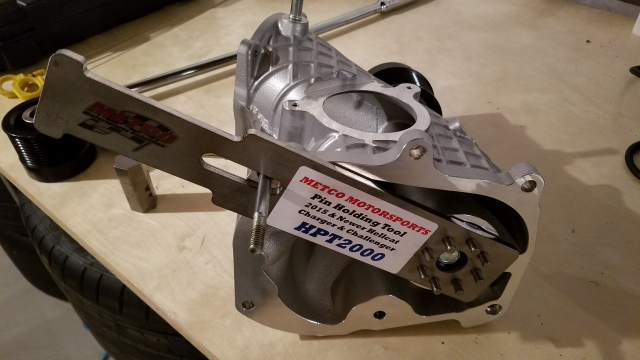
9. create wood jig (tap/slam impression on end of 2”x 4”x 2’ - drill holes)

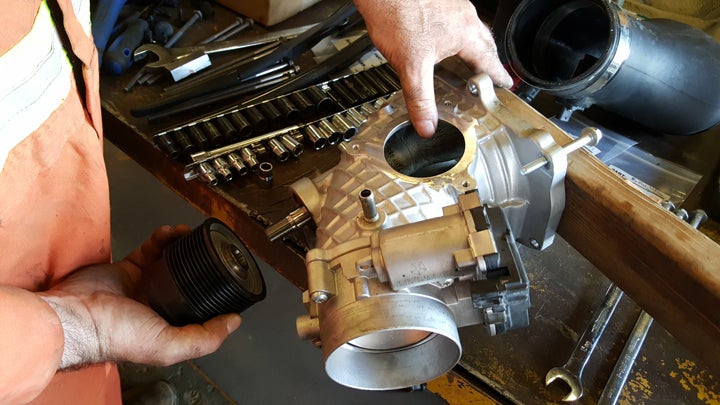
10. remove pulley with hex tool (recommended optional part with new pulley - get it !) / minimum 3/4” drive socket wrench with breaker bar, if needed, (DO NOT USE IMPACT GUN) turn CCW and with wood jig (leverage wood securely under a bolt placed in the upper right snout bolt hole -my inner bolt stayed put and pulley came off relatively easy)
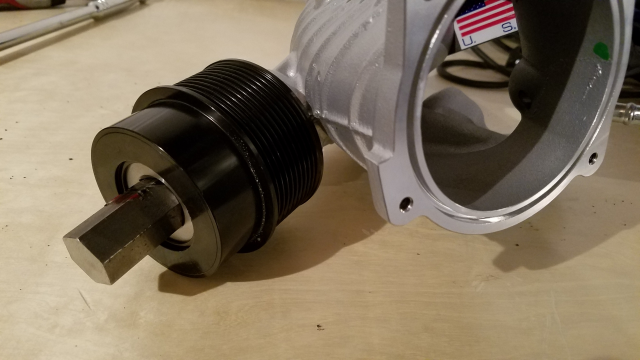
11. screw on new pulley w/ locktight provided, torque 50-70ft.lbs (DO NOT USE IMPACT GUN) (i did 70ft.lbs. since Metco pulley does not have any run-on ((one way coupler)) the engine might try to back it off during deceleration conditions, who knows?)
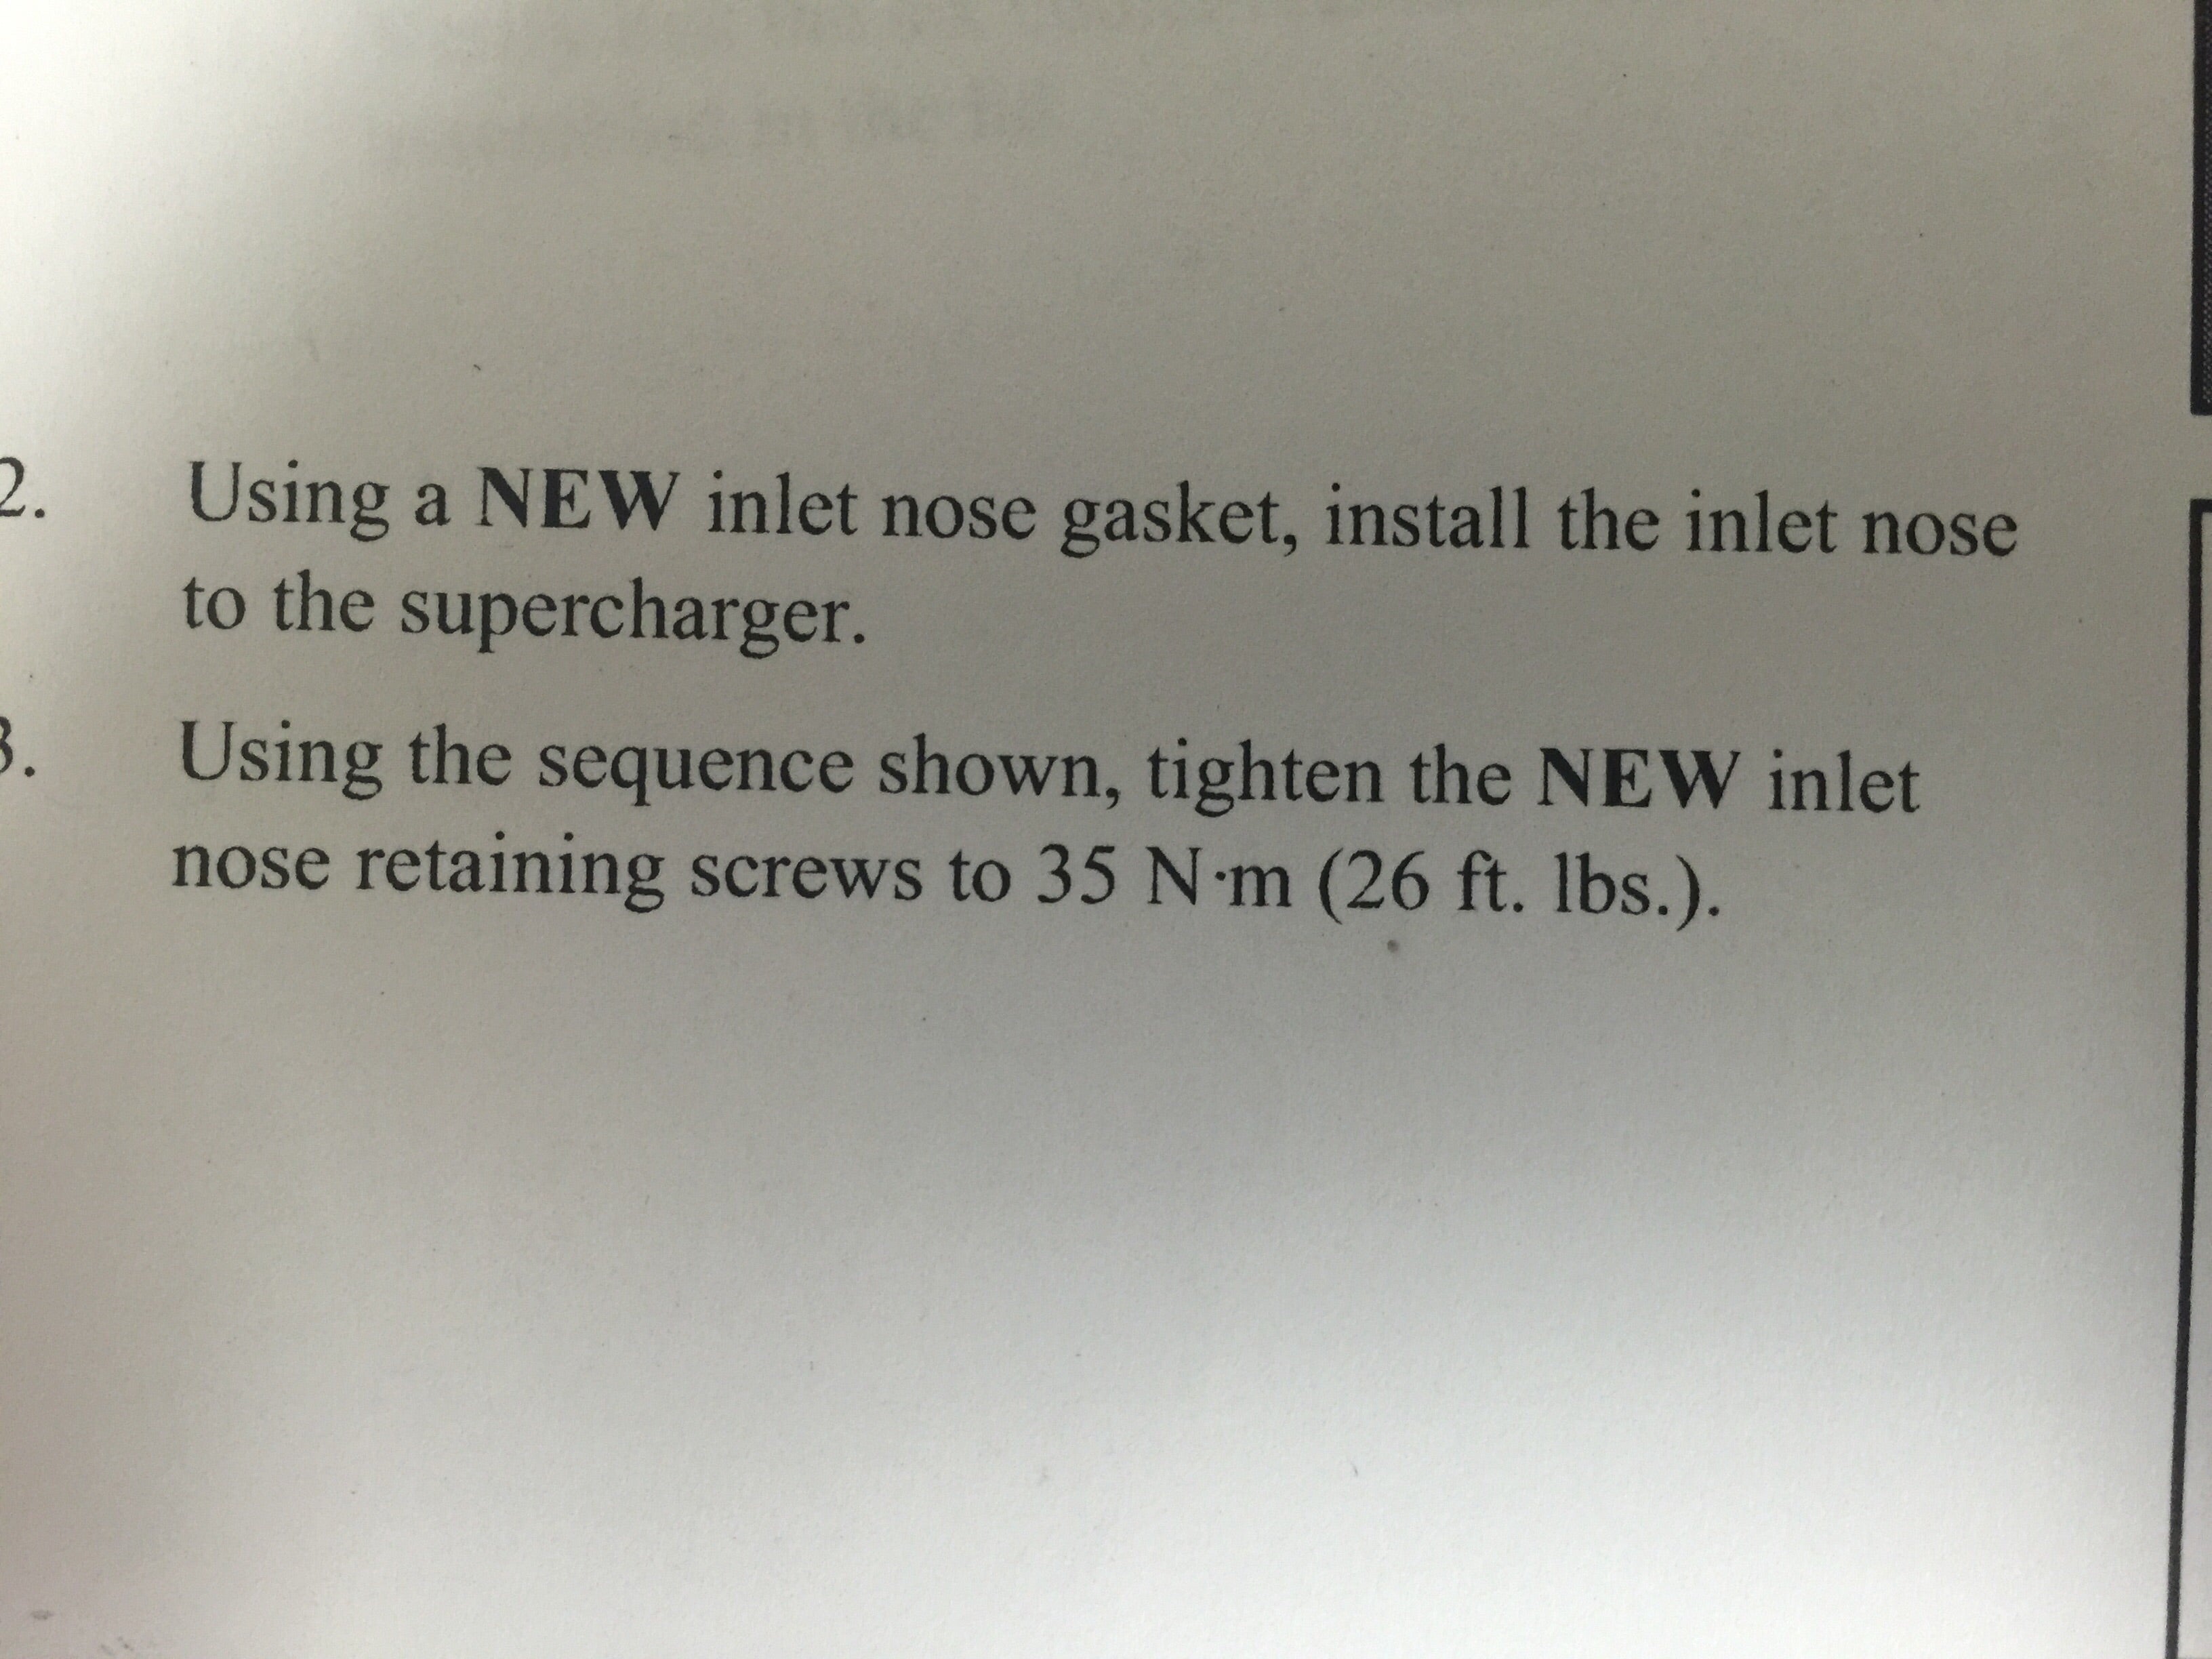
12. install snout (spin pulley lining up 6 dowel pins into the holes, torque pattern to 26ft. lbs.)

13) install bypass valve grommet (these were not very tight I torqued to 7ft.lbs, no biggie, it has an o ring gasket and the lid pushes it down)
14) lower SC onto the 2 front dowel guides on each front corner- first ensuring there is no debris in gasket area and the gasket has not moved (remove prop-ups, and slowly drop...ensure injector pigtails are free and clear - use bar with zip tie on pulley for added balance /control)
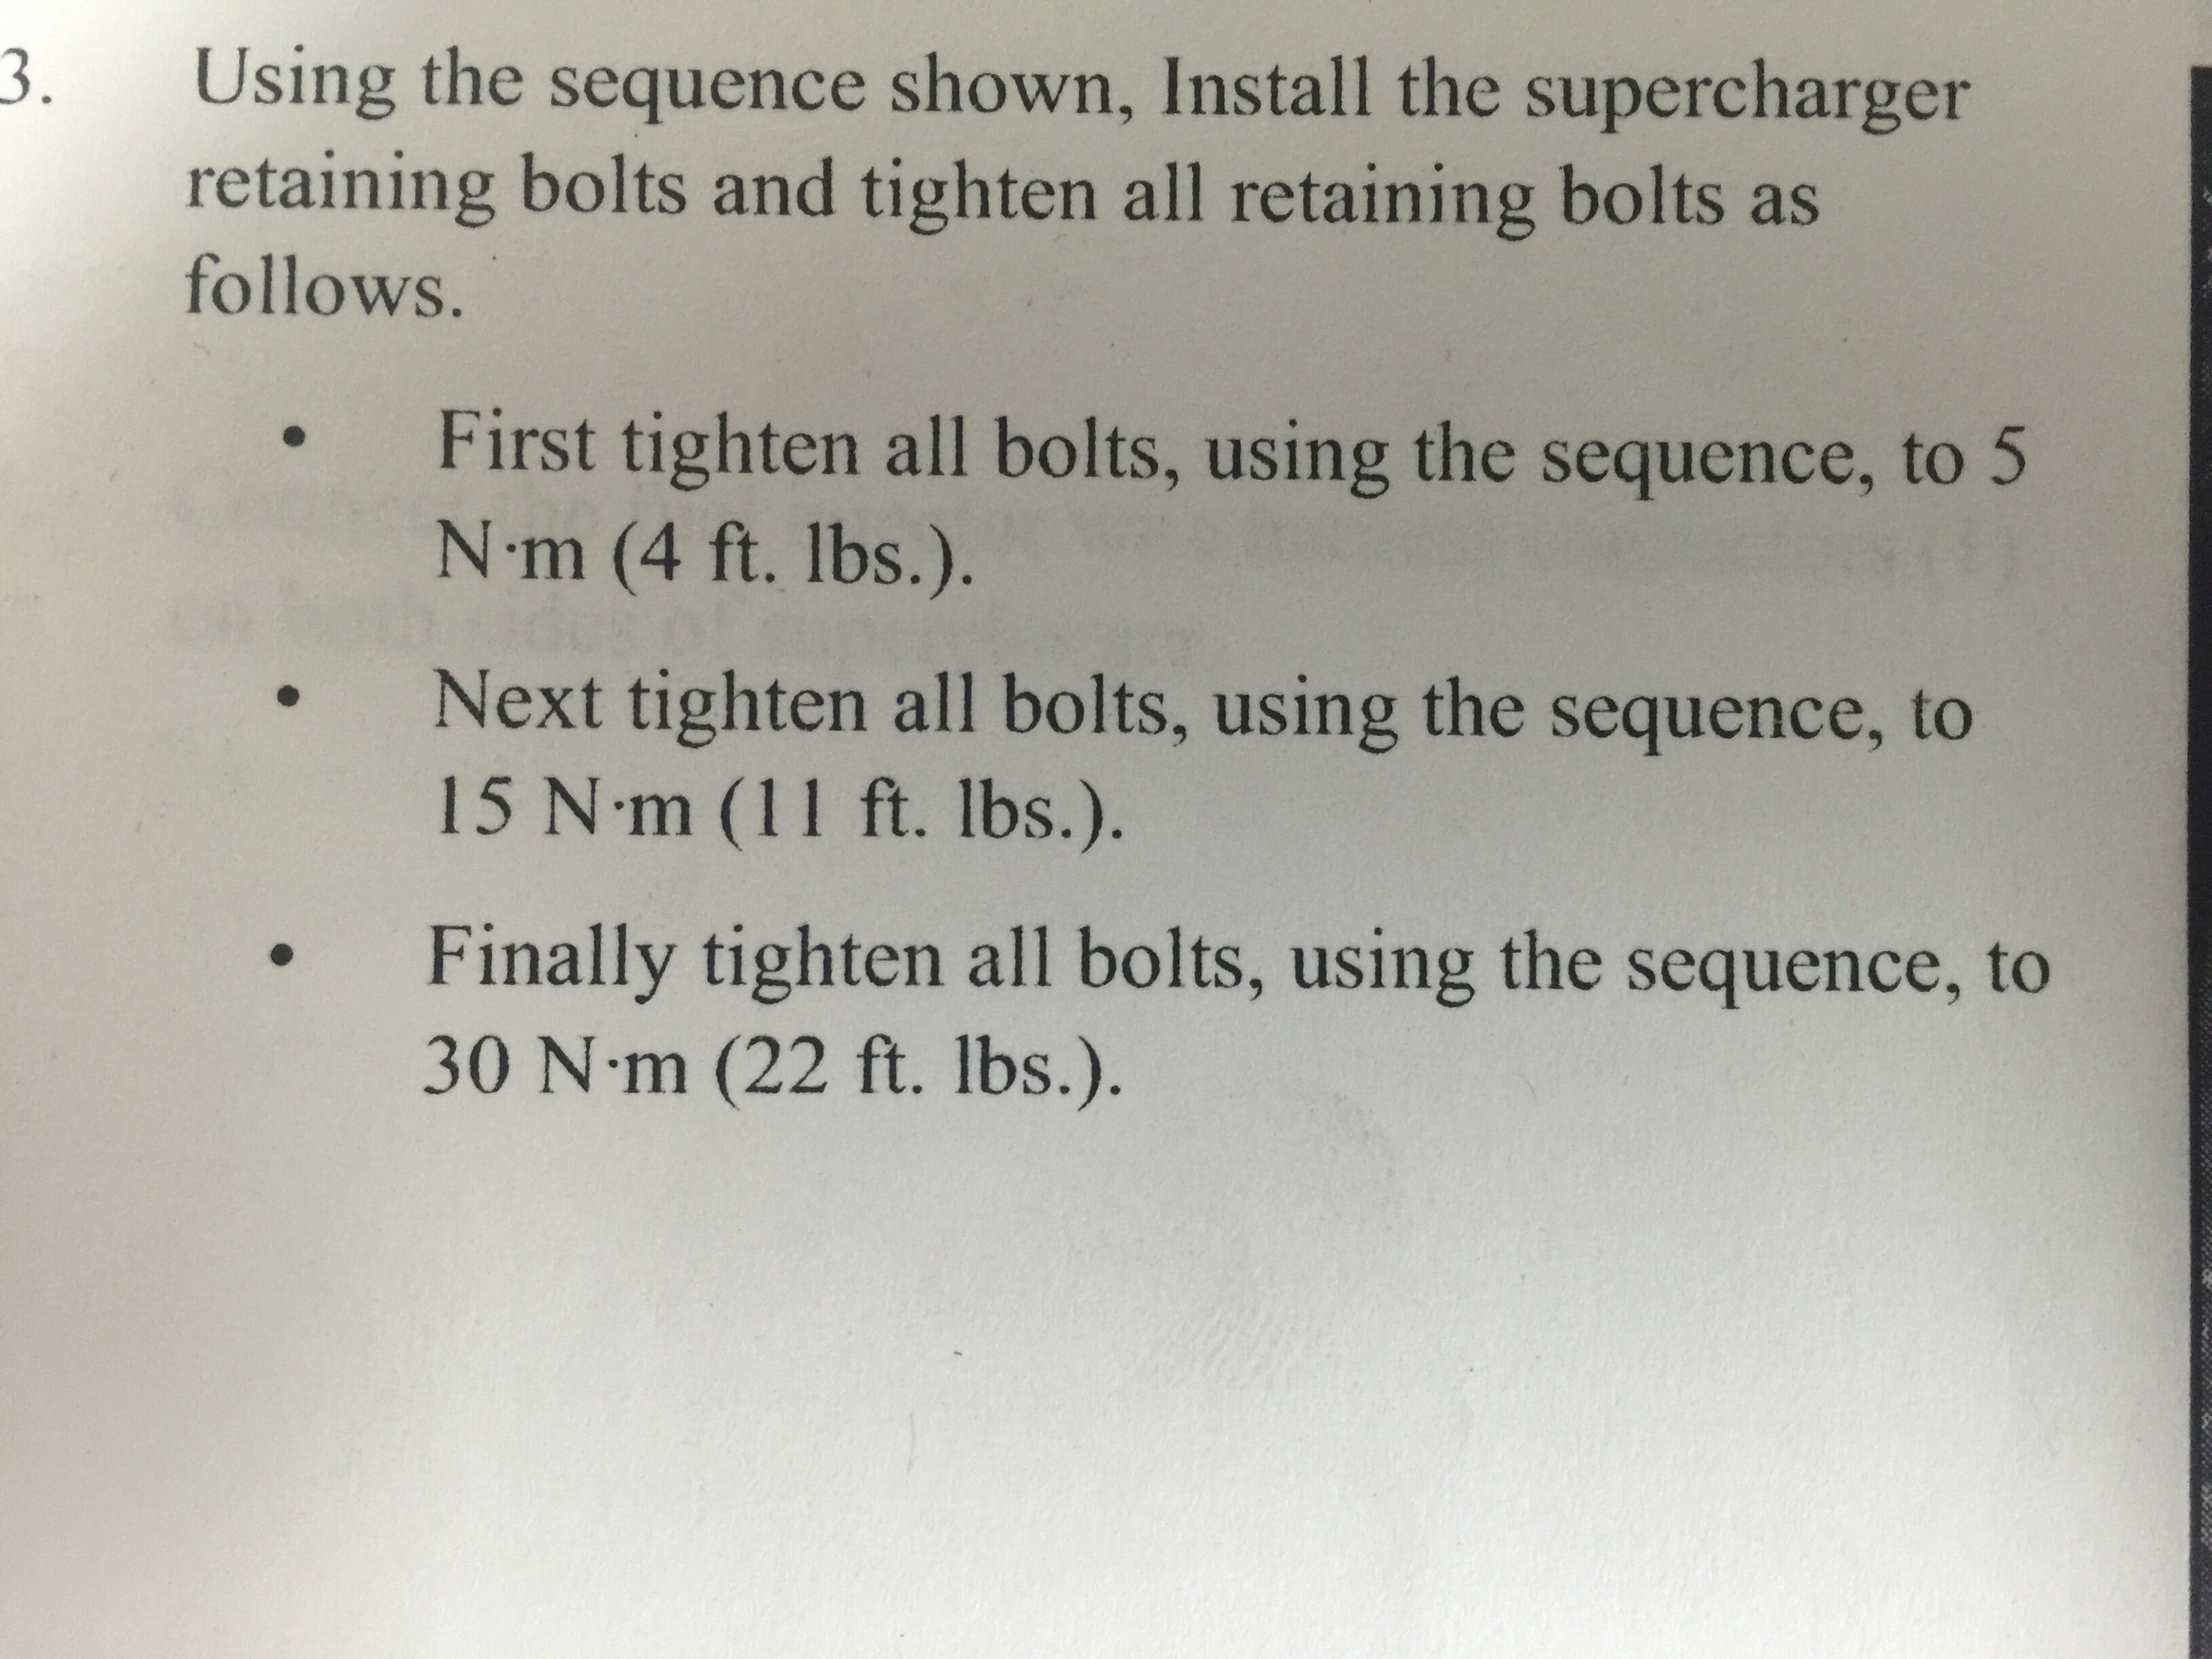
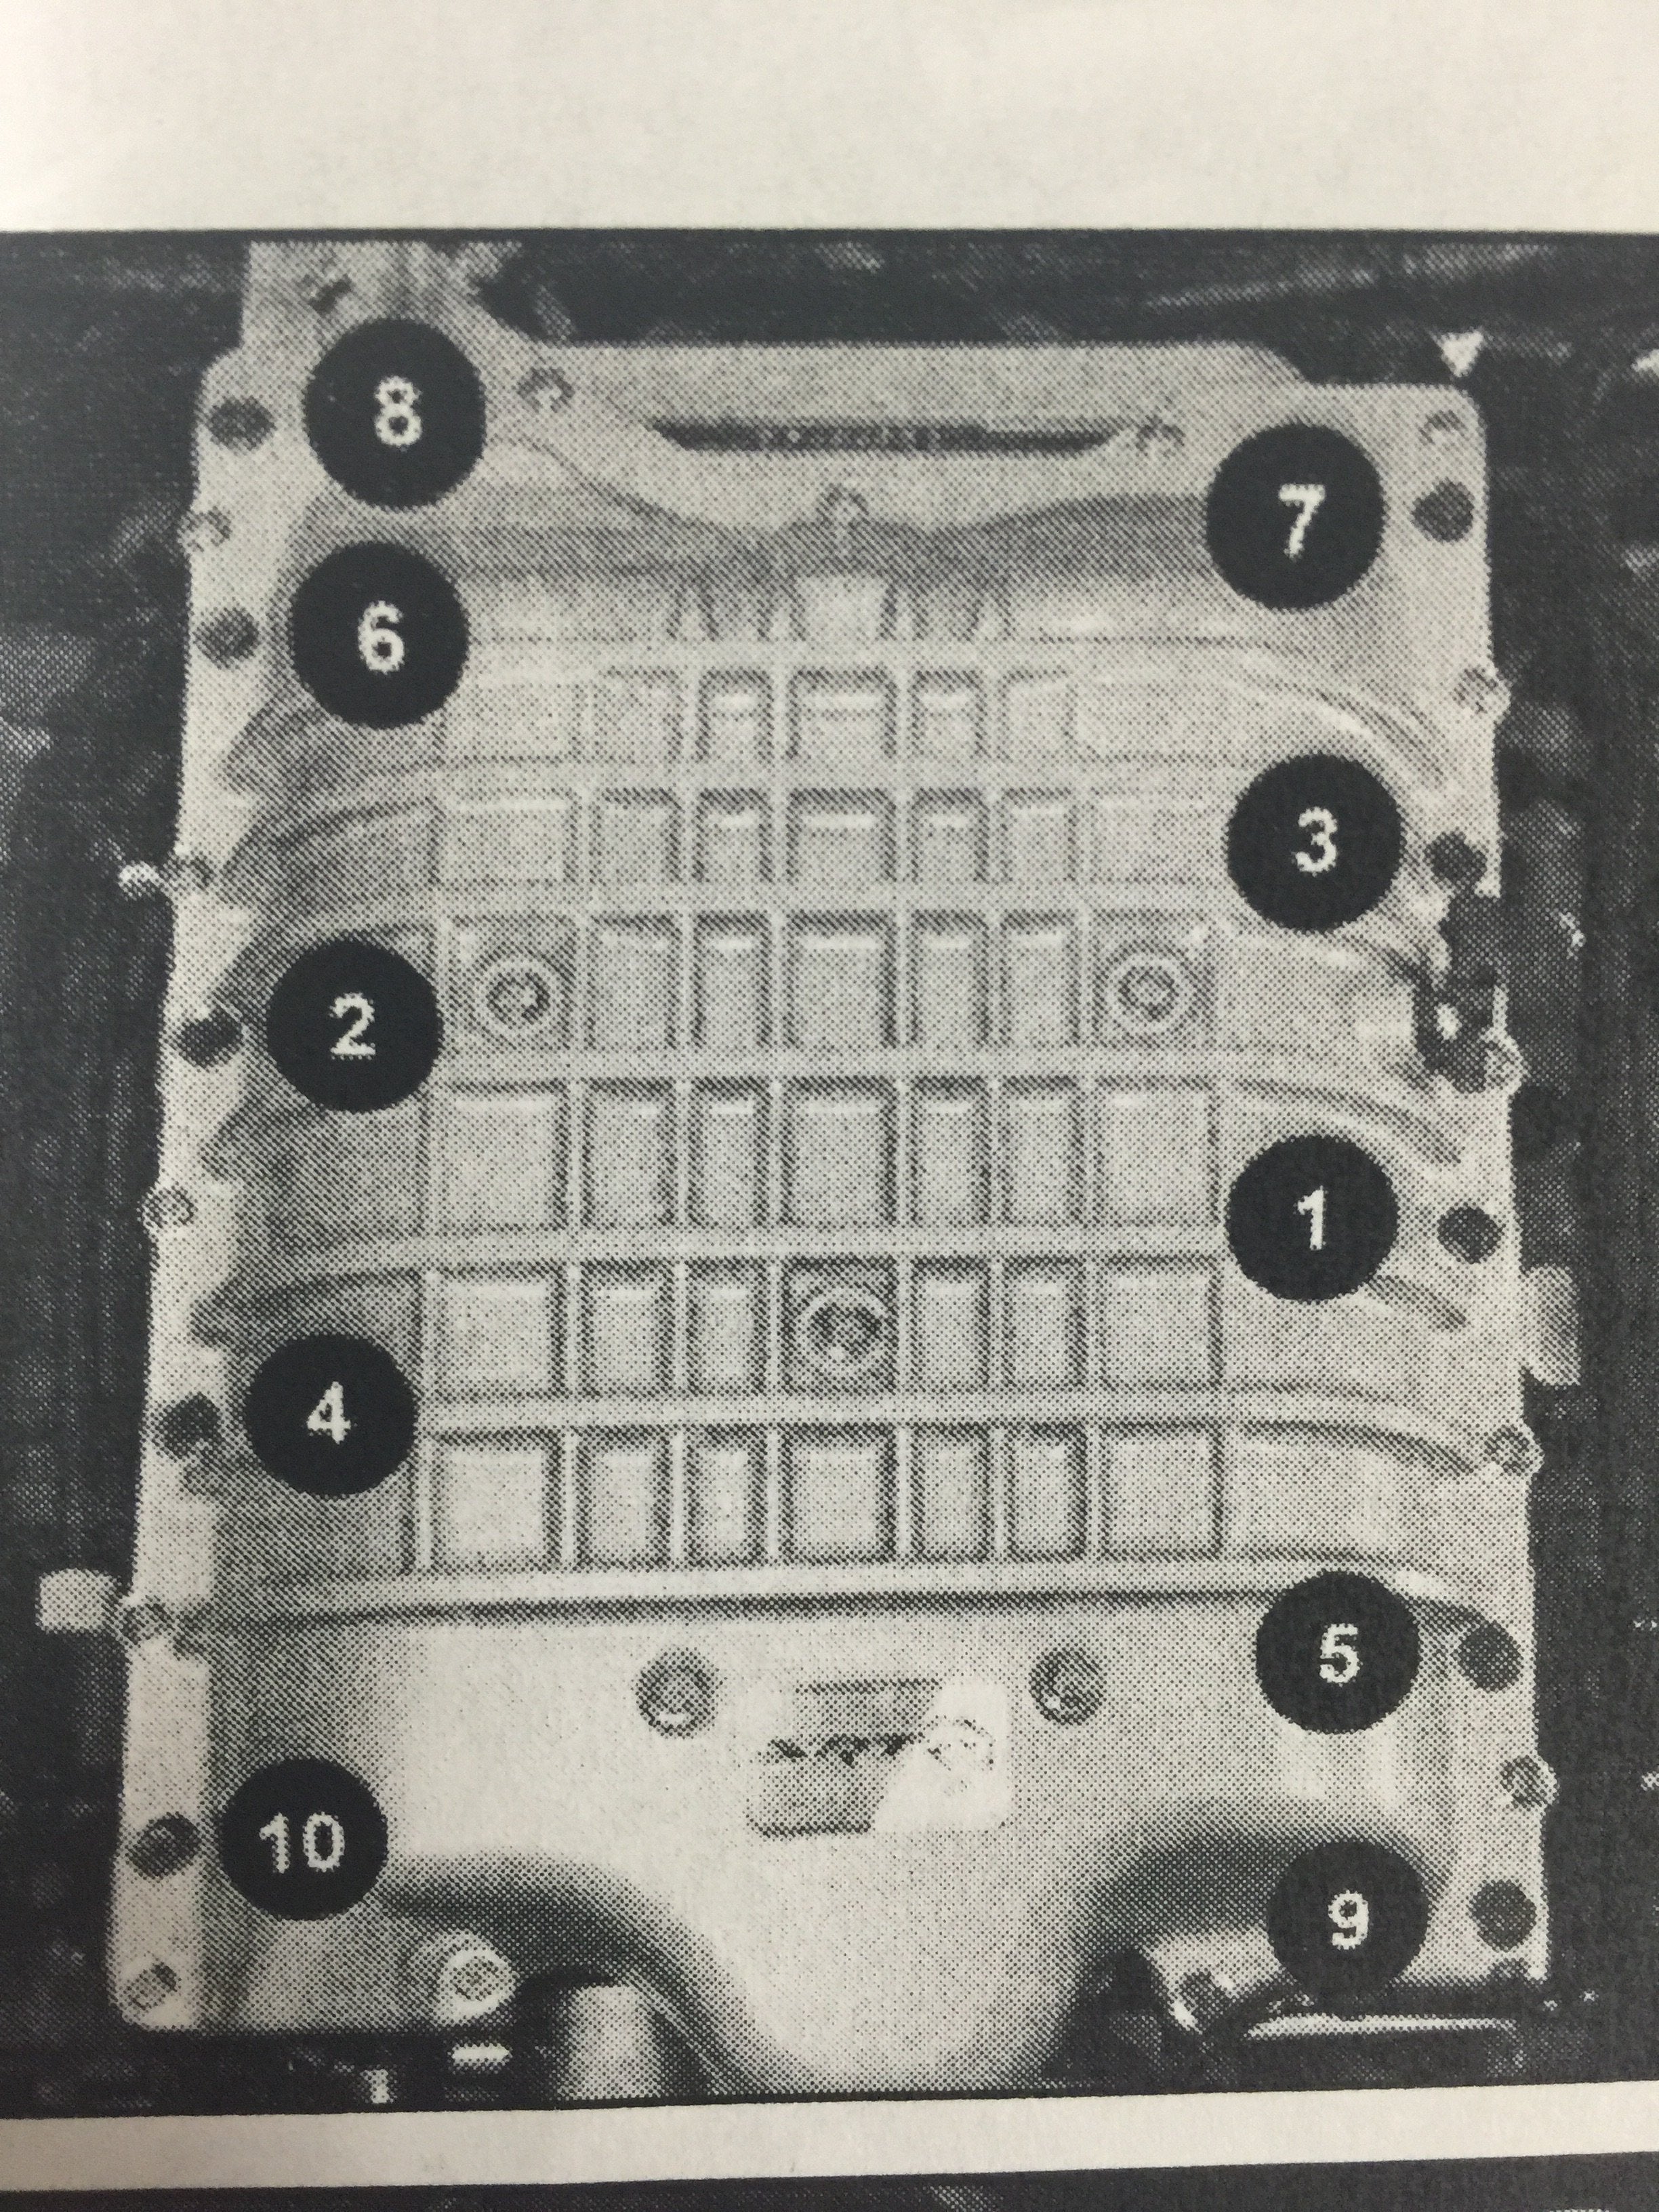
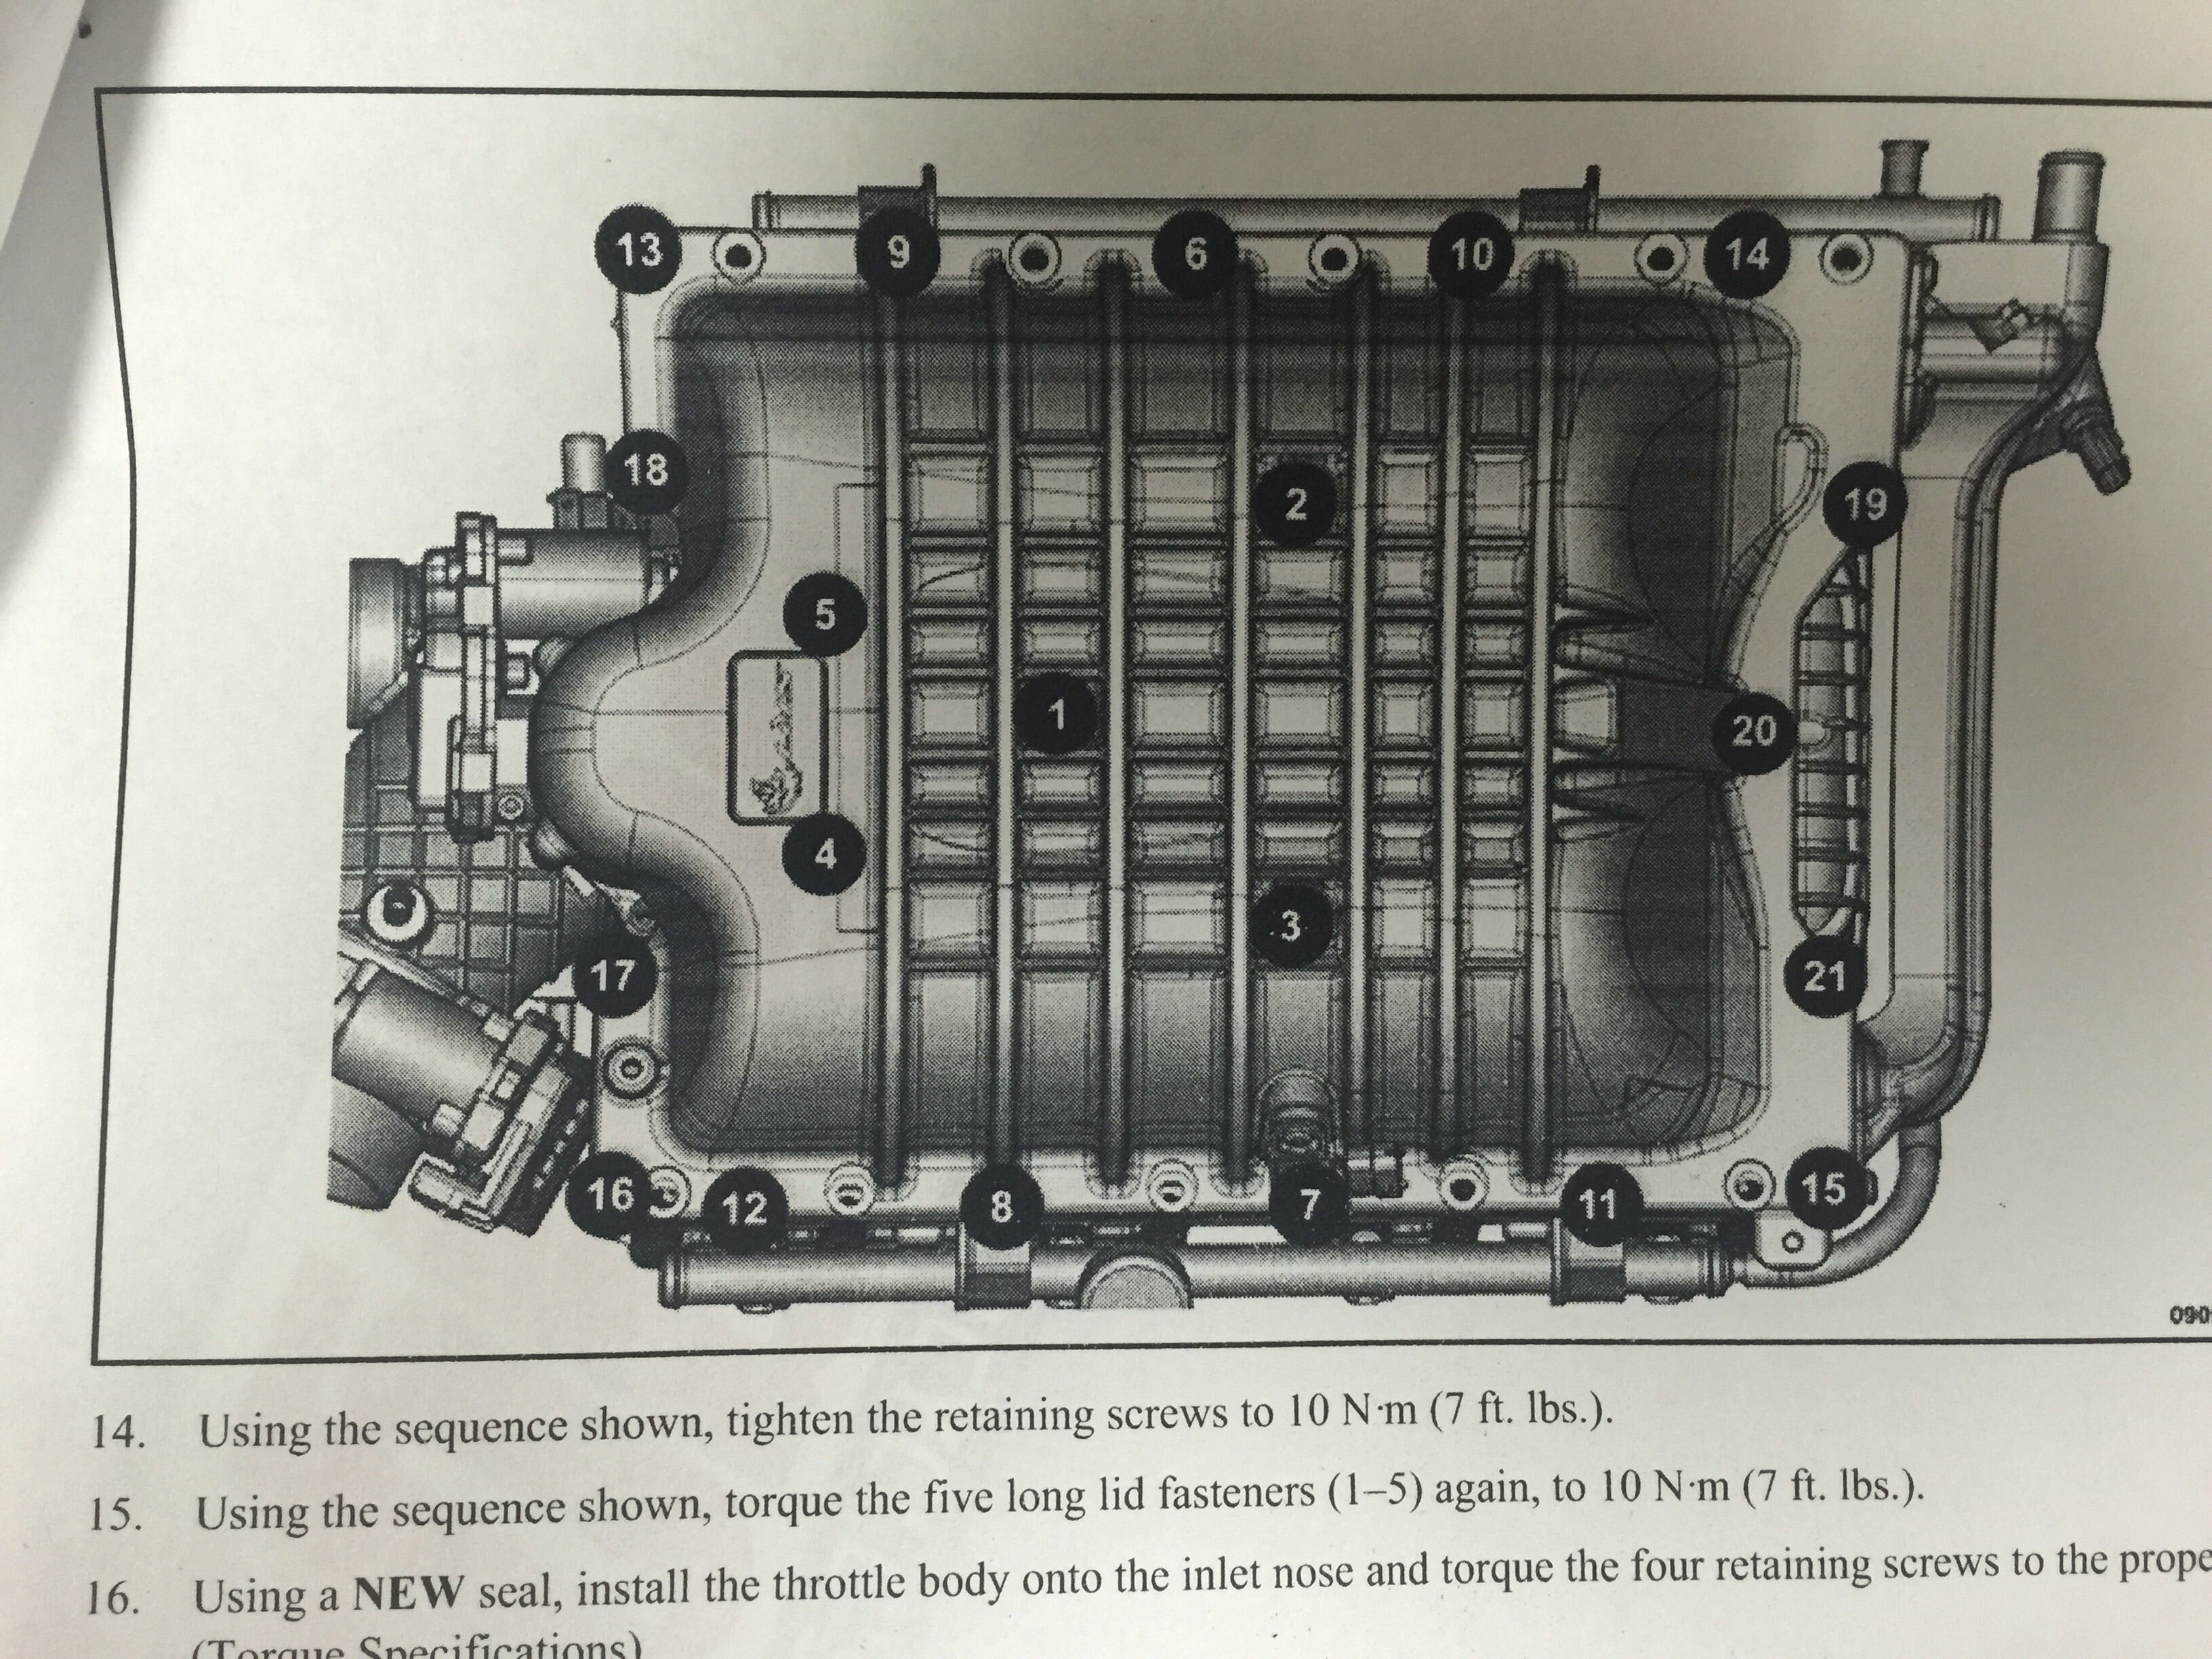
15) wiggle all retainer and lid bolts in by hand to ensure properly lined up gasket, then hand tighten, then torque to pattern / spec ) sc retainer (22ft.lbs) /lid bolts (7ft.lbs) Triple check all torque amounts on all bolts with a good appropriately sized torque wrench
16) install air intake
17) re-connect all connectors
18) pull new sc belt onto pulley (slac the tensioner while pulling belt over pulley) - ensure all ribs are covered on all pulleys / idlers - ensure tensioner is roughly in middle position
19a) re-connect battery
19) fire it up and turn it off immediately for belt inspections, then fire it up again and give it some quick short punches of throttle, shut down, check belts...
20) install wiper bracket/cowel/ then wipers (line up wipers along the factory white markers on your windshield then bolt on - then test function, adjust if necessary)
21) Before Flashing PCM- (always ensure your battery is charged, close all doors, trunk, hood, lights, radios, AC, anything that drains the battery, put parking brake on so head lights remain off) Flash new modified tune to PCM (in DSdownloader, click on "send tune to tool", browse for the new tune on you computer (ensure it is the correct file), then finally it will ask you to browse for the original tune "back up copy"...find the original copy/backup .drg file - ((ensure it is the correct file) you should have saved it on your computer before you emailed it to the tuner for him to modify) (technically it will compare both files and only write the difference between them- ie the changes the Tuner made) Plug handheld in (follw directions given, and flash the new tune (ensure the tune file name is correct when its done)
22) Tuner should have also given you a pre-set "dashboard" of PID’s they want to see, you save this (.dsh) file to : mydocuments > DSdataviewer > Dashboards folder and can then load this dashboard up in the DS dataviewer top menu "new dashboard" drop down menu...before you start recording the log...
23) plug handheld into car - when it boots up, plug usb into laptop with DS Dataviewer program open, press the "re-connect to tool" icon on top menu, the handheld tool will go into remote control mode....select the correct dashboard from drop down menu...click on the little lightening bolt icon on top menu, this will start streaming live info from the car, (you can open a chart view or gauge clusters view by clicking on menu Edit > Add Chart Tab or > Add Gauge Tab...(you don't have to select all or any of the PID'S listed on the left side, the selected ones will be displayed...but they will all be recorded) then, finally, when you are ready for you're ready for 1st WOT test run press the record (O) red button in top menu...(probably best to have a passenger friend do all these tasks while you concentrate on the road!) ...Capture WOT datalog on road (4th gear- A8, from a 55-65mph roll in autostick 4th gear) or dyno (5th or 6th gear -A8) also either record the A/F ratio, if you doing it on road with a video camera or by memory (have digital A/F gauge on the vehicles center cluster) ...if datalogging on the dyno keep track visually & use their A/F sensor off of the left bank / ....(when you stop recording it'll automatically ask to save the log file and you should type in the note box that will pop up, what the lowest A/F ratio you observed @ WOT..ie 11.1-11.2 etc) email datalog & A/F info to tuner...(for some reason they can't see or calculate A/F yet with DS PID's but it's no biggie as you can see it or film it) wait to receive fine revised tune (best to datalog with laptop and handheld using DS dataviewer...as it includes the dashboard easily and you'll need it)....the tuner will start rich and work towards a leaner but safe fine tune
24) Flash revised fine tune ("send tune to tool" from laptop, then flash to vehicle)
25) GUN IT !!!!
26) Be safe
This is a Wiki - Additional pictures, info, specs, methods, welcome !
2015 Charger with 23,000 Miles
Mods: Metco 2.85" pulley, DS unlocked PCM, DS Trinity T1000, HHP/Hemituner Custom Tune, Procharger crank pin kit and new crank bolt, DSS AL DS, AFe Intake, 180 tstat, Nitto 305/35R20 - 555R's
Prework: (Based on DiabloSport)...install unlocked PCM (you tube video), ensure you have & appropriate usb drivers for your laptop & latest DSdownloader & DSdataviewer software (uninstall older version of both if you have them before you install new ones) with DSdownloader program open you can update the tool (bottom tab > express tune mode > "Update tool" button) to latest (DCX_gas.CROM) is on DS handheld. Backup/copy the stock PCM tune (.drg) file format with DS handheld plugged it into OBDII port (select vehicle : 6.4L SRT8 (don’t worry it doesn’t matter that it is not a Hellcat) and then tell it to install “93 OCT performance tune” or anything from the performance menu - NOTE: it will not install this tune onto your PCM, as that’s not what you want anyways, but it will copy/backup the original OEM tune from the PCM, once it's done, you can exit back to main menu and unplug handheld) , transfer tune to your computer with DSdownloader by clicking “get tune from tool” button (bottom tab menu > express tune mode) , make sure you remember name & save this tune somewhere on laptop (best to copy this file again and save as back up somewhere else like on a usb flash drive) ...email this (.drg) file to tuner with list of all mods....may take a week or two to receive new tune, take this time to clear the common P1645 code or others with your handheld and then run car with new PCM and ensure smooth operation and no more codes...(should be cherry)...once you get the new modified tune...start to install the Mods...(this way you can flash it right away and have fun immediately)
Install Pulley:
Pre-wash engine especially where base of SC mates to engine
1a. Disconnect battery in Trunk
1b. remove wipers (pop off covers, unscrew bolts, lift hinge @ 90 degrees, pull off)
2. remove wiper cowl/braket (plastic push pins/clips at base of windshield/ some bolts on wiper bracket and clips on wiper motors)
3. un-clip any sensor connectors (there will be a few style of connectors, be patient and un-clip properly - no need for excessive forces) on SC/Snout/TB/CAI or that will pull when you lift SC lid later (tuck aside) you do not need to touch the injector pigtails or sc coolant lines or fuel rails...yay!
4. remove air intake tube from TB (can leave air box in place) (Leave TB connected to SC snout)
5. remove sc lid (leave bypass valve on lid, slowly & slightly lift lid .5” from middle front, un-stick sc lid gasket slowly & gently all around with flat screwdriver, (mine was stuck between both so it would have ripped if I just quickly lifted), once free, carefully remove gasket entirely (inspect , place aside on clean surface), lift off lid entirely (bypass valve will wiggle rest of the way out of the rubber grommet, retain the 6 x 1.5” long -thin green rubber gaskets, 3 on each side on underside of lid -they seal some intercooler gaps- push them back into their slot on SC lid), (cover/block the exposed rotor air outlet so nothing falls down in there)
5a. If you damaged some gaskets here is the gasket assembly kit you'll need to order: 68267539AA
5a. remove bypass valve grommet bracket (3 bolts)
6. remove both belts completely, then put new sc belt loosely in its belt path but not around the sc pulley yet, then fully install the other serpentine belt- as you can’t get the sc belt on unless other belt is off
7. lift front front of SC up with crowbar or beaker bar zip tied around pulley lift by 1.5”, prop up each side with something soft & durable – I used rubber screwdriver handles...(bar provides a controlled lift so as not to disturb the steel intake gasket -mine was stuck on underside of SC) (note: pulley in this picture is the new one)
8. remove snout - to access (13mm) bolts you’ll need approx. 9” swivel extension socket, pull /wiggle snout straight back (retain the 6 dowel drive pin bushings seated in the SC housing as some might come out all together or simply need to be tapped back in, also ensure gasket remains unscathed –mine was stuck and didn’t move off the housing –perfect !)
9. create wood jig (tap/slam impression on end of 2”x 4”x 2’ - drill holes)
10. remove pulley with hex tool (recommended optional part with new pulley - get it !) / minimum 3/4” drive socket wrench with breaker bar, if needed, (DO NOT USE IMPACT GUN) turn CCW and with wood jig (leverage wood securely under a bolt placed in the upper right snout bolt hole -my inner bolt stayed put and pulley came off relatively easy)
11. screw on new pulley w/ locktight provided, torque 50-70ft.lbs (DO NOT USE IMPACT GUN) (i did 70ft.lbs. since Metco pulley does not have any run-on ((one way coupler)) the engine might try to back it off during deceleration conditions, who knows?)
12. install snout (spin pulley lining up 6 dowel pins into the holes, torque pattern to 26ft. lbs.)
13) install bypass valve grommet (these were not very tight I torqued to 7ft.lbs, no biggie, it has an o ring gasket and the lid pushes it down)
14) lower SC onto the 2 front dowel guides on each front corner- first ensuring there is no debris in gasket area and the gasket has not moved (remove prop-ups, and slowly drop...ensure injector pigtails are free and clear - use bar with zip tie on pulley for added balance /control)
15) wiggle all retainer and lid bolts in by hand to ensure properly lined up gasket, then hand tighten, then torque to pattern / spec ) sc retainer (22ft.lbs) /lid bolts (7ft.lbs) Triple check all torque amounts on all bolts with a good appropriately sized torque wrench
16) install air intake
17) re-connect all connectors
18) pull new sc belt onto pulley (slac the tensioner while pulling belt over pulley) - ensure all ribs are covered on all pulleys / idlers - ensure tensioner is roughly in middle position
19a) re-connect battery
19) fire it up and turn it off immediately for belt inspections, then fire it up again and give it some quick short punches of throttle, shut down, check belts...
20) install wiper bracket/cowel/ then wipers (line up wipers along the factory white markers on your windshield then bolt on - then test function, adjust if necessary)
21) Before Flashing PCM- (always ensure your battery is charged, close all doors, trunk, hood, lights, radios, AC, anything that drains the battery, put parking brake on so head lights remain off) Flash new modified tune to PCM (in DSdownloader, click on "send tune to tool", browse for the new tune on you computer (ensure it is the correct file), then finally it will ask you to browse for the original tune "back up copy"...find the original copy/backup .drg file - ((ensure it is the correct file) you should have saved it on your computer before you emailed it to the tuner for him to modify) (technically it will compare both files and only write the difference between them- ie the changes the Tuner made) Plug handheld in (follw directions given, and flash the new tune (ensure the tune file name is correct when its done)
22) Tuner should have also given you a pre-set "dashboard" of PID’s they want to see, you save this (.dsh) file to : mydocuments > DSdataviewer > Dashboards folder and can then load this dashboard up in the DS dataviewer top menu "new dashboard" drop down menu...before you start recording the log...
23) plug handheld into car - when it boots up, plug usb into laptop with DS Dataviewer program open, press the "re-connect to tool" icon on top menu, the handheld tool will go into remote control mode....select the correct dashboard from drop down menu...click on the little lightening bolt icon on top menu, this will start streaming live info from the car, (you can open a chart view or gauge clusters view by clicking on menu Edit > Add Chart Tab or > Add Gauge Tab...(you don't have to select all or any of the PID'S listed on the left side, the selected ones will be displayed...but they will all be recorded) then, finally, when you are ready for you're ready for 1st WOT test run press the record (O) red button in top menu...(probably best to have a passenger friend do all these tasks while you concentrate on the road!) ...Capture WOT datalog on road (4th gear- A8, from a 55-65mph roll in autostick 4th gear) or dyno (5th or 6th gear -A8) also either record the A/F ratio, if you doing it on road with a video camera or by memory (have digital A/F gauge on the vehicles center cluster) ...if datalogging on the dyno keep track visually & use their A/F sensor off of the left bank / ....(when you stop recording it'll automatically ask to save the log file and you should type in the note box that will pop up, what the lowest A/F ratio you observed @ WOT..ie 11.1-11.2 etc) email datalog & A/F info to tuner...(for some reason they can't see or calculate A/F yet with DS PID's but it's no biggie as you can see it or film it) wait to receive fine revised tune (best to datalog with laptop and handheld using DS dataviewer...as it includes the dashboard easily and you'll need it)....the tuner will start rich and work towards a leaner but safe fine tune
24) Flash revised fine tune ("send tune to tool" from laptop, then flash to vehicle)
25) GUN IT !!!!
26) Be safe