• Sign Up! To view all forums and unlock additional cool features

    Welcome to the #1 Dodge, Jeep and RAM Forum dedicated to FCA owners and enthusiasts. Register for an account, it's free and it's easy, so don't hesitate to join the SRT Forum today!


Picking up a M6 Hellcat

thetalonguy

500 Posts Club
Founding Member
Premium Account
Donating Member
HFCOTM
Member ID
#1036
Messages
778
Reactions
2,189
Likes
182
City
Long Island
State
NY
Country
United States
Vehicle
2017 Challenger HC M6
You remove both the black o-ring and the blue orifice valve.

Was immediately noticeable to me...but I guess everyone feels things differently.
34CC12CA-14AF-40AD-B755-321F51536975.jpeg


OP
A

AeroF16

2000 Posts Club
Donating Member
Member ID
#2826
Messages
2,197
Reactions
7,014
Likes
252
City
Phoenix
State
AZ
Country
United States
Vehicle
2016 Challenger Hellcat
Thread Starter #302
Alright, removed them from the new bearing assembly.

And I lied about the old bearing, the O ring was in there.

I removed the hydraulic stem off the old bearing and attached a piece of tubing. I’m going to hook this back up, then use it as the contraption to flush the hydraulic line from the brake master cylinder with new fluid.

46345517-7898-4EAE-99F8-FC13027B77A9.jpeg


Smitty

1000 Posts Club
Premium Account
HFCOTM
Member ID
#2260
Messages
1,871
Reactions
5,246
Likes
212
City
Canton
State
MI
Country
United States
Vehicle
2019 Challenger HC WB
You must think I'm a dumb, crayon-eating, Jarhead that is going to fall for your bait...


:unsure:


Maybe I'll put it up on the Quickjack this weekend and see what I can see with a borescope???


I don't recall, is there an adequate inspection hole on this trans???


;)
Aw @BULL you’re too hard on yourself. But you better check it🤔 Just to be safe.


OP
A

AeroF16

2000 Posts Club
Donating Member
Member ID
#2826
Messages
2,197
Reactions
7,014
Likes
252
City
Phoenix
State
AZ
Country
United States
Vehicle
2016 Challenger Hellcat
Thread Starter #304
Got the trans installed today. Cleaned up the input shaft, did a bench bleed of the clutch release bearing then installed it, then cleaned out the splines of the clutch disk hubs the best I could with a pick to get the larger chunks off and then a tooth brush with some brake parts cleaner on it to get some of the residue.

The pilot bearing didn’t have any evidence of grease on it, so I used a long screwdriver with some bearing grease on the end to put some in the bearing. Then I applied a little bit of bearing grease to the end of the input shaft as well.

Just cleaning the crap off the input shaft made it 100x smoother, then I applied some of the molykote grease to the shaft and clutch disk hubs and wiped almost as much as I could back off, leaving just a thin coating of it on the shaft.

I’ll put the driveshaft on tomorrow, along with the exhaust, and see how it goes.

6240E194-4394-4030-8236-8D253B3FDDCB.jpeg


1971demon

Poster Club Hall of Fame
Founding Member
Member ID
#1122
Messages
19,234
Reactions
41,803
Likes
352
City
Orchard Park
State
NY
Country
United States
Vehicle
2018 Demon 2016 Hellcat
You must think I'm a dumb, crayon-eating, Jarhead that is going to fall for your bait...


:unsure:


Maybe I'll put it up on the Quickjack this weekend and see what I can see with a borescope???


I don't recall, is there an adequate inspection hole on this trans???


;)
Trouble findin a hole to inspect on a tranny...:oops::oops:..have a few more crayons...;)


jgilj

1000 Posts Club
9 Second Best E/T
Member ID
#1483
Messages
1,336
Reactions
11,138
Likes
162
City
Brooksville
State
FL
Country
United States
Vehicle
21 Challenger Super Stock
This is what you need !


Attachments

OP
A

AeroF16

2000 Posts Club
Donating Member
Member ID
#2826
Messages
2,197
Reactions
7,014
Likes
252
City
Phoenix
State
AZ
Country
United States
Vehicle
2016 Challenger Hellcat
Thread Starter #307
This is what you need !
Yeah, would’ve been a little more comfortable doing it that way. @Deano was generous enough to offer up his space and lift for me to do this job (we live just a few miles from each other) but I chose the convenience of working on it at home.

Not so bad but lots of getting under the car, then getting out, then getting back under, haha. Good exercise I suppose. I have a third garage bay that is out of the way, so the car can just stay up on the jack for as long as I’d like without interfering with daily life.

691570A4-0C8F-4C8D-B6EC-AE5387D675B5.jpeg


OP
A

AeroF16

2000 Posts Club
Donating Member
Member ID
#2826
Messages
2,197
Reactions
7,014
Likes
252
City
Phoenix
State
AZ
Country
United States
Vehicle
2016 Challenger Hellcat
Thread Starter #308
Also, this is what I was picking out of the area between the pilot bearing and the back of the engine block. I imagine they greased it at assembly, stabbed the trans and pushed most of the grease forward and out of the bearing or clutch disk hubs.

This was just gunked up forward of the pilot bearing and this is exactly how it looked inside, I just stabbed it with the pic and it came out as one piece.

A7DCEF7D-DC7D-4DC0-B249-F9027E639E1B.jpeg


BULL

Oh NO! Not that guy!
Staff Team
Founding Member
U.S. Marine Veteran
Donating Member
HFCOTM
Wiki Contributor
Member ID
#1079
Messages
14,757
Reactions
45,305
Likes
402
City
Weld County
State
CO
Country
United States
Vehicle
MY16 M6 Challenger Hellcat
HFCOTM
View Images
Disks free of any excess grease squished out?


OP
A

AeroF16

2000 Posts Club
Donating Member
Member ID
#2826
Messages
2,197
Reactions
7,014
Likes
252
City
Phoenix
State
AZ
Country
United States
Vehicle
2016 Challenger Hellcat
Thread Starter #310
Disks free of any excess grease squished out?
There actually wasn’t hardly any grease on the disk hubs, like almost none, so I assume so. The clutch wasn’t slipping at all prior to me pulling it apart.

I was very careful removing this stuff, nothing fell down into the disks, but it was tedious. I made sure not to over apply the new grease, so I’m not worried about it on the re-install.

Guess we’ll see though!


OP
A

AeroF16

2000 Posts Club
Donating Member
Member ID
#2826
Messages
2,197
Reactions
7,014
Likes
252
City
Phoenix
State
AZ
Country
United States
Vehicle
2016 Challenger Hellcat
Thread Starter #311
Disks free of any excess grease squished out?
There is about 1/8” gap between the pilot bearing and the engine block though and that is where the clumped up grease on the pick was hanging out. I was able to see it with a flashlight and it came right out once I stabbed it with the pick.


16GoManGoHC2

3000 Posts Club
Founding Member
9 Second Best E/T
Member ID
#1139
Messages
3,322
Reactions
7,854
Likes
252
City
Nanticoke
State
PA
Country
United States
Vehicle
2016 Challenger He’ll Cat
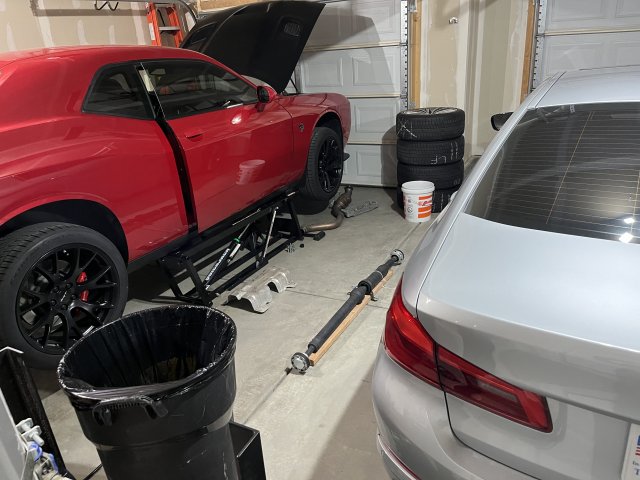
Another observation, if your car sits for a while (like over the Winter) in an environment that isn’t climate controlled, the clutch pressure plate and other metal parts inside are going to rust due to moisture buildup.

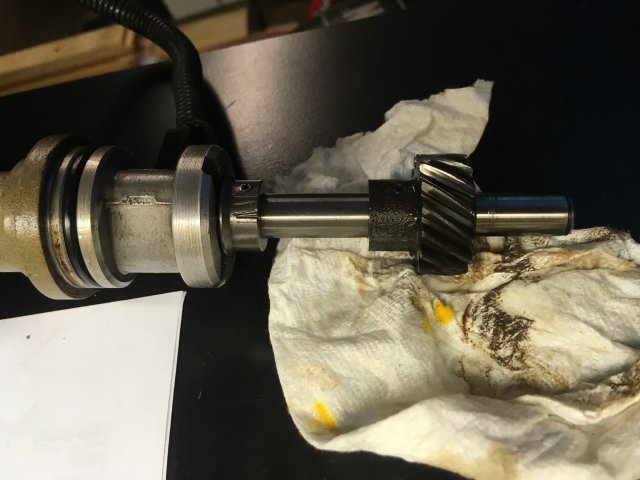
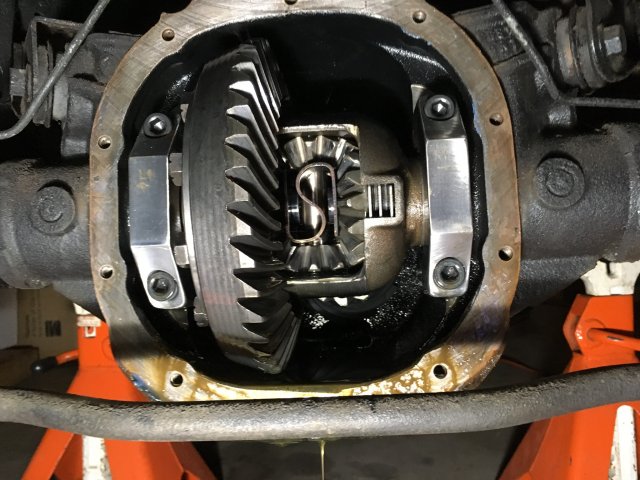
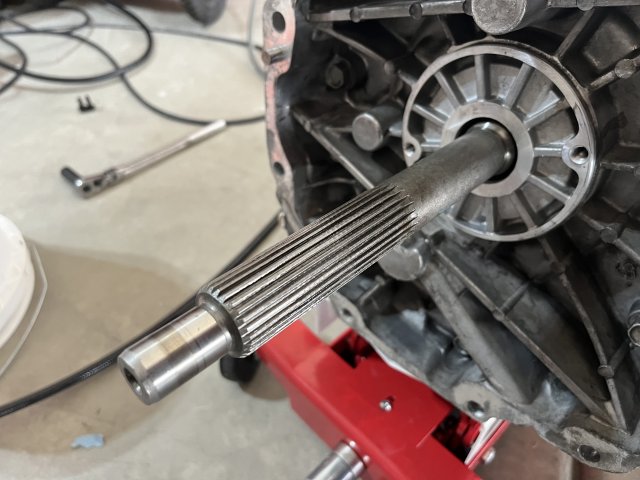
Here is a picture of the current throw out bearing. Take a look at the four asymmetric rust “dots” on the face of the bearing. That is where the bearing interfaces with the fingers on the pressure plate. My guess is that happened from sitting and not being used. Why aren’t there more rust spots on the bearing face from the other fingers of the pressure plate? I don’t know, maybe these were positioned at the low 6 o’clock position when it was stored and the moisture built up worse in that area?

All that to say, I’d probably get it up to temp and drive around the neighborhood once in while (weekly?) if you can. Honestly though, the bearing still spins freely with no resistance, so it probably doesn’t matter from a performance aspect, just from a cosmetic @BULL OCD aspect haha.

View attachment 64557
That happens to pistons rings as well during winter storage, especially if stored in a area that sees constant temperature swings which produce allot on condensing events ice cold at night to mid 40’s or worse a spurt of 50 here and there. More so if stored above a wet surface, horrible if over bare ground or gravel. Best thing one can do is right before final shut down on a nice hot engine is drizzle some oil into the intake till she’s smoking and kill it while it’s smoking. And don’t restart it again until it’s ready to be driven again. If you want to turn the engine over a turner to by hand that’s not a bad idea but usually for just a three month storage. Just let her sit. That’s what I would do with my cat if I had to leave it outside for the entire winter. That’s how I stored my Capri for over 25 years the first probably 5 to 10 years of that was outside on my grandmother‘s patio and it was doused with oil heavily and sat for a long long time and when I resurrected it back in 2017 or so I took the valve covers off punk and cover off carburetor bowl‘s off everything was clean as a whistle I let it run out of fuel why I was dousing it with the oil and we are starting to spit and sputter because it was out of fuel I dumped all the oil in the carburetor and chocked it off with it. Turned it by hand with a breaker bar about every 6 months or so. This is how she looked inside after sitting 25 years. Flushed out the gas tank and lines, changed ALL fluids including blowing 5 Qts of brake fluid through the brake lines, primed the oil syste, and the day of start up I had my boy turn the key while I was under the hood, carb was full, 2 pumps on the accelerator, hit the key and it fired instantly, I mean on the first spark pulse, I have a video of it and the HUGE grin on my boys face listening to the then open header monster thumping away inside the garage was PRICELESS!!
BDA30E16-4A4C-4334-B172-00A568C6A62E.jpeg 5BBF257F-26DC-454F-8E52-8C4B93E24656.jpeg 07D42F31-9F9F-4AFF-BD75-09D9D2044BC0.jpeg CF4A962F-1B80-4743-AC28-B50484C4DA9D.jpeg 31C49E8F-A0B8-4BBE-8E60-0BB338B8BBDD.jpeg 91BA5D97-FA20-44B8-915B-2DBB6535AD76.jpeg 8BAF8705-769F-4044-8BC6-E1F9FA579BD2.jpeg AE05D4A5-A324-401C-AE4D-C99F9AAE887F.jpeg BEA4AC40-0481-427D-9B6D-4E9337FBAFE5.jpeg 8E33C6EA-BE7B-4E73-B4EB-B7E06C4FE79D.jpeg EC9B636E-AF4E-4458-B29E-A37178C535D7.jpeg A005CF74-AEAE-4BFE-8B43-4DE5E7D9FE34.jpeg


16GoManGoHC2

3000 Posts Club
Founding Member
9 Second Best E/T
Member ID
#1139
Messages
3,322
Reactions
7,854
Likes
252
City
Nanticoke
State
PA
Country
United States
Vehicle
2016 Challenger He’ll Cat
BTW, was a 12 second street car on 16” Dunlops street tires back in 87-88 (sprayin) which was a pretty mean machine for that era. I take it to the track more then the cat as on engine alone it’s a 13.25 car over and over and gets to the finals very often so it makes for a fun CHEAP night, just pump 93 and play, no changing tires, filling the bottle, breaking shit, it’s built tough and simple.


16GoManGoHC2

3000 Posts Club
Founding Member
9 Second Best E/T
Member ID
#1139
Messages
3,322
Reactions
7,854
Likes
252
City
Nanticoke
State
PA
Country
United States
Vehicle
2016 Challenger He’ll Cat
So guess I should go ahead and remove the CDV. I haven’t looked into it too much yet but I just remove the black O-ring, then remove the blue orifice behind it? Do I reinstall the O-ring?

This is a pic of the new bearing. The old bearing still has the blue orifice in it but does not have the O-ring, that’s MIA. Wonder if the previous owner thought he was doing the delete by just removing the O-ring or if it wasn’t installed at the factory where the bearing assembly was built.

@BULL you said you did this and couldn’t really tell much of a difference?

View attachment 64620
the actual valve is the blue item in that stack, take BOTH items out, the clutch line seals on a oring on its OD. Look at its orientation as it’s meant to go in one way or it will work in the opposite fashion if put back in backwards should you ever put it back in some day


OP
A

AeroF16

2000 Posts Club
Donating Member
Member ID
#2826
Messages
2,197
Reactions
7,014
Likes
252
City
Phoenix
State
AZ
Country
United States
Vehicle
2016 Challenger Hellcat
Thread Starter #315
So here’s the contraption I made to bleed the clutch line and get the old fluid out. Took the stem off the old bearing and connected up to the hydraulic line from the master cylinder.

Hooked up the pressure bleed with new brake fluid in it and then pumped to 10 psi, watched the fluid go clear, let it run for a while and then relieved the pressure. Disconnected the old fitting and stabbed the line into the new bearing.

Pretty easy job, took about 75 pumps of the pedal to get it completely bleed. The bottom pic is of the fluid that initially came out.

Question about the reservoir though. Why does half still look dark (right side) and the half looks new (left side)? The fluid coming out of the hydraulic line was definitely the new fluid.

A77F9569-8A68-4C0B-8A93-49030BF76B2E.jpeg
8FFE4CE3-7343-44DD-988C-E76B15399E9C.jpeg
2244FE46-8ABD-4C70-A918-15D6FDF247FA.jpeg


OP
A

AeroF16

2000 Posts Club
Donating Member
Member ID
#2826
Messages
2,197
Reactions
7,014
Likes
252
City
Phoenix
State
AZ
Country
United States
Vehicle
2016 Challenger Hellcat
Thread Starter #316
Well I got the car back together today and took it for a test drive. It drove great and the shifts are very smooth now. The car did warm up for quite some time in my garage while I was checking for any fluid leaks, so I guess I’ll get a cold test tomorrow.

I suspected I had a small exhaust leak but it’s gone now. I replaced the gaskets between the cats and the manifolds, maybe it was there, I don’t know. Whatever noise I was hearing at idle (clutch in/clutch out conversation in this thread) is now gone. The diff was making a bit of noise too, especially at slow speed turns, but I changed the diff fluid while it was in the air and now the diff is nice and quiet. I changed the oil too while I was at it.

All in all, very happy. All the little nuances that needed attention got fixed. Only time will tell if the shifting issue is truly fixed.

This trans jack was worth it’s weight in gold too. Used it to not only get the trans out but remove/install the drive shaft and the exhaust (which is pretty dang heavy for one person). Appreciate all the advice/comments, shoutout to @16GoManGoHC2 for all the advice.

663F47EE-BFEF-4DAA-BC92-14EE0D8F983C.jpeg


Hickster

4000 Posts Club
Founding Member
HFCOTM
Member ID
#781
Messages
4,892
Reactions
6,292
Likes
302
City
Seminole
State
FL
Country
United States
Vehicle
2018 Hellcat Challenger
Well, hell, I suppose,,, I should getster my car back tomorrow. I suppose we will all be happy. I suppose,, butster I am counting them chickens before them are hatched, I supposed. A Tennessee thang. Don't them count yetster. I lost my fone again, so I will have to visit the collision, garage, place, to pick up my car. Maybe will all be happy on Monday.


OP
A

AeroF16

2000 Posts Club
Donating Member
Member ID
#2826
Messages
2,197
Reactions
7,014
Likes
252
City
Phoenix
State
AZ
Country
United States
Vehicle
2016 Challenger Hellcat
Thread Starter #318
I’ll also add that I cannot tell any difference with the CDV removed. Feels the same to me but I never had any funky issues with it in the first place.


Hickster

4000 Posts Club
Founding Member
HFCOTM
Member ID
#781
Messages
4,892
Reactions
6,292
Likes
302
City
Seminole
State
FL
Country
United States
Vehicle
2018 Hellcat Challenger
Well, hell from being from over younder, how wood you know?? I wonder??


OP
A

AeroF16

2000 Posts Club
Donating Member
Member ID
#2826
Messages
2,197
Reactions
7,014
Likes
252
City
Phoenix
State
AZ
Country
United States
Vehicle
2016 Challenger Hellcat
Thread Starter #320
Also, does the ECU re-learn after the battery has been disconnected for a while?

I had the batt disconnected for about a week and, driving around today, I seem to have a lot more popping/crackling out of the exhaust on deceleration (like if I am driving around and just let off the gas).

The car runs great and I don’t have any codes or anything, just something I noticed.


Top